In order to capture the best shots for my music video, I will need to get to grips with the camera I will be using for my project, the camera I will be using is the Nikon D3200. I will need to learn the different interesting aspects in which the camera is capable of creating, so I have made this post for revision and also future reference when using the camera.
Changing the aperture:
Changing the aperture will be an important skill in which I would need to learn, this is because it helps create a stronger depth of field for various shots. I have found a video in which shows how to change the aperture on the D3200.
Below is an extract I found from
here describing how to control the depth of field usng aperture:
Although a lens can only bring objects at a single distance from the camera into critically sharp focus, other parts of the scene in front of and behind the most sharply focused plane appear acceptably sharp. The area in which everything looks sharp is called depth of field. Objects within the depth of field become less and less sharp the farther they are from the plane of critical focus. As the distance increases, things eventually become so out of focus that they no longer appear sharp at all. The near and far edges of your depth of field are usually not visible as exactly defined boundaries. Instead, sharp areas imperceptibly merge into unsharp ones. At normal shooting distances, about one-third of the depth of field is in front of the plane of critical focus (toward the camera), and two-thirds is behind it (away from the camera). When the camera is focused very close to an object, the depth of field becomes more evenly divided.
To see the depth of field on an SLR-type camera, you press a depth of field preview button that stops down the aperture to the one that will be used to take the photo. On point and shoot digital cameras, the best way to check depth of field is to take a trial picture and then play it back on the monitor where most cameras will let you zoom it and then scroll around it to examine details.
Often it doesn't matter so much exactly what you are focused on. What does matter is whether or not all of the objects you want to be sharp are within the available depth of field so they appear sharp. There are reasons you may want parts sharp or not. You may want only a part of the setup in sharp focus to give it emphasis against a softer foreground or background. On the other hand you may want everything sharp to show details. To control how deep or shallow depth of field is, you have three factors to work with.
- Aperture size. The smaller the size of the lens aperture (the larger the f-number), the greater the depth of field. The larger the aperture, the shallower the depth of field.
- Camera-to-subject distance. As you move father from the subject you are focused on, you increase depth of field. As you move closer, you decrease it.
- Lens focal length. Zooming out to a wider angle of view increases depth of field. Zooming in decreases it.
Each of these three factors affects depth of field by itself, but even more so in combination. You can get the shallowest depth of field with a lens zoomed in on a nearby subject using a large aperture. You get the deepest depth of field when you are farther from a subject, with the lens zoomed to a wide angle, and using a small aperture.
How to do it: NOTE; It can't be adjusted in live view mode. To adjust the aperture exit the live view mode on hold down the exposure compensation button, which looks like +/- at the top-right of the camera. Then turn the adjustment wheel situated below.
Movie mode settings:
The movie mode setting gives the user a variety of settings which could help them whilst recording, for example a view which shows you sound levels and where the film will be cropped. More importantly there is an option which gives you a range finder. You can change the movie settings by pressing the 'info' button at the top of the camera.
Changing image quality:
Press the info button to the left of the screen, you can browse through a variety of settings but 'qaulity' is located at the top of the list. In order to gain the best shots you must change the quality settings to 'raw'.
Future referencing
Before I go out and start filming I will make sure I watch the video situated below in order to revise all the different buttons and options the D3200 has to offer:
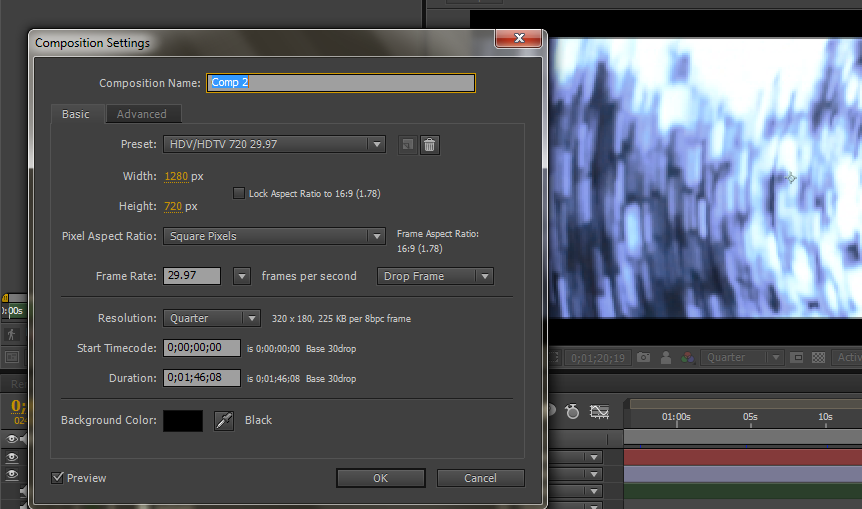 Here are the composition settings I have used for my music video, 1280x720 was the screen size in which I will be using meaning that my final project will be in HD.