Construction: Day 2 of filming and editing
Today I set out to collect the rest of the filming I would need for the remainder of my music video, myself and the actor set a time in which we would go out and film, thankfully, the weather held up nicely and we were able to get the shots we needed. I spent around 2 hours filming as I took the time to get as many shots as possible which would help me with editing later on.
As I finished filming, I uploaded the clips to my computer and started the editing process all over again. Because I already created the template, color correction, composition settings etc for the opening 1:30 of my music video, I really didn't need to add much apart from the clips of course. Below are some images of me editing on Adobe After Effects:
 The effect I wanted on some clips was the reverse effect, to create this, I clicked on the chosen effect, went to TIME then TIME REVERSE LAYER.

Next I wanted to play around with the colour corrections, as you can see the image is now black and white, to do this I clicked on the adjustment layer I created earlier, went to EFFECTS > COLOUR CORRECTIONS > HUE/SATURATION.

The next common process was to just add the clips in which I filmed earlier today, this was the simple 'drop and drag' process onto the timeline, I then would crop the clips to the appropriate size.
 To gain a final copy of my first draft I would have to add the footage to the render que, To do this, I went to FILE > EXPORT > ADD TO RENDER QUE. I then changed the file settings to H.324 and then add audio by ticking the 'Audio preferences'.
I have finally editing together a 'draft' final edit for my music video, the reason why it is a draft is because I would like some feedback given to me about whether or not it's good or if there is something I can change. You can watch my music video below:
As I finished filming, I uploaded the clips to my computer and started the editing process all over again. Because I already created the template, color correction, composition settings etc for the opening 1:30 of my music video, I really didn't need to add much apart from the clips of course. Below are some images of me editing on Adobe After Effects:
Next I wanted to play around with the colour corrections, as you can see the image is now black and white, to do this I clicked on the adjustment layer I created earlier, went to EFFECTS > COLOUR CORRECTIONS > HUE/SATURATION.
The next common process was to just add the clips in which I filmed earlier today, this was the simple 'drop and drag' process onto the timeline, I then would crop the clips to the appropriate size.
I have finally editing together a 'draft' final edit for my music video, the reason why it is a draft is because I would like some feedback given to me about whether or not it's good or if there is something I can change. You can watch my music video below:
Construction: Editing + Take two of opening
After watching back my first draft of the opening 1:30 of my music video, I decided to completely revamp the whole music video to make it look better, the first problem in which occured to me was the shakiness of the original footage, this made the video look incredibly weak and I knew that this could possibly knock marks off my final piece. I also made sure I had another go at lip syncing the correct lines as last time was a complete failure and made my music video laughable. During the editing process of the second take of the music video, I had used exactly the same features (anamorphic, color correction) to build the video together, below you are able to watch the first 1:30 of the second take of my music video:
Research: Audience feedback on practice shot
After creating an opening 1 minute practice of my music video I have collected audience feedback on what people think about the practice, this will help me determine the strengths and weaknesses of my practice clips and ultimately help me create a better final piece. Below are some of the comments in which i have collected from various different people.
The concept of the music video is interesting however a lot of the shots are shaky and will need to be stabilised.
I like the different shots throughout the music video however the miming to the lyrics are slightly off and would need to be changed.
The shots chosen in the woods are good and I like the colour correction however the some shots are out of focus and shaky meaning they will need to changed.
These comments I have collected help me give me an idea of how I can improve my music video, it also shows me the strengths in which i can either keep or redo to make it even better. I will take all of these comments on board so that I will get the best results.
Construction: Editing Day One
After I had captured the first section of my music video, I felt that in order to understand whether I had filmed the right clips, I would edit together a first draft together. The software I used to edit the draft together was Adobe After Effects, below I will leave some proof shots of me editing.
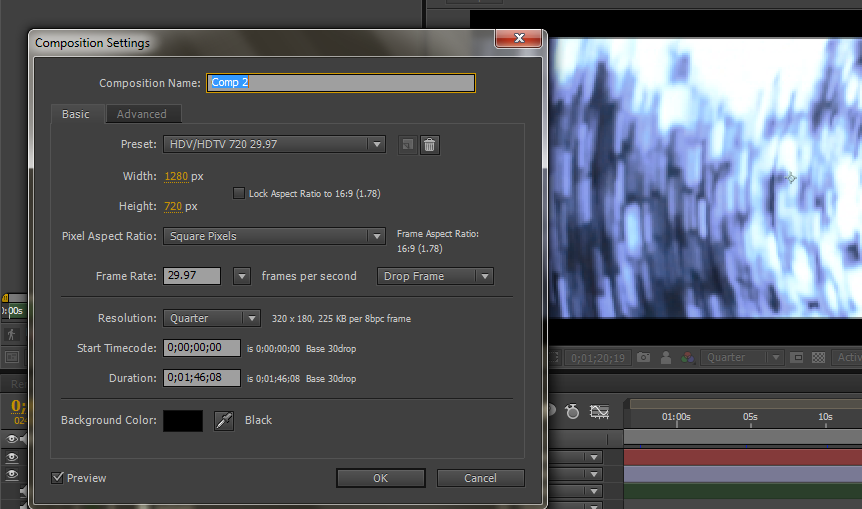 Here are the composition settings I have used for my music video, 1280x720 was the screen size in which I will be using meaning that my final project will be in HD.
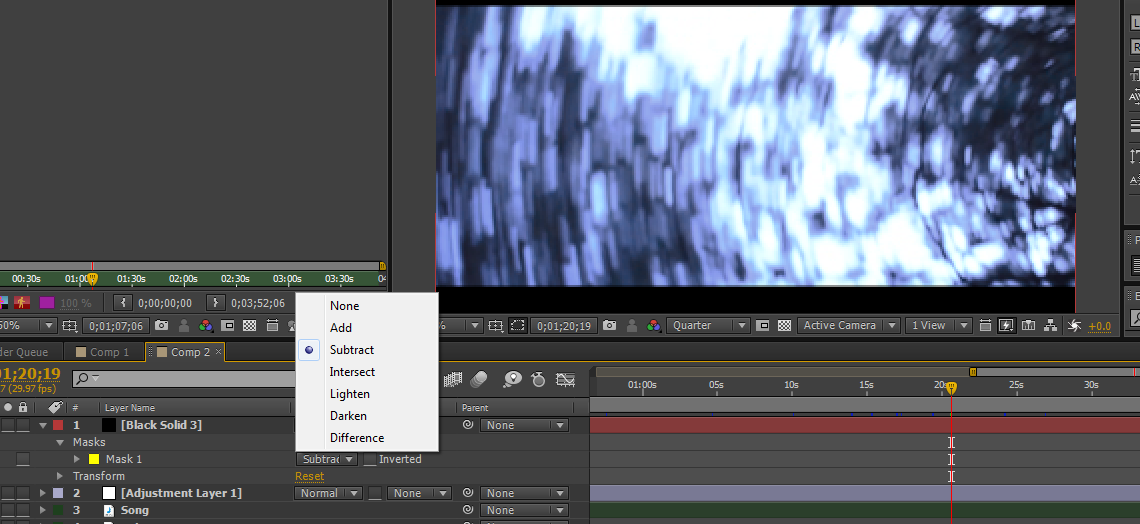
To get the anamorphic look in my music video, I created a black 'solid' layer, I then used the rectangle tool to create a suitable black rectangle over the video, I then changed the rectangles settings to 'subtract'.
 To not get confused when working on the work panel with all the different clips, I had collectively changed the color of the markings to helps identify the music, the introduction and the main music video.
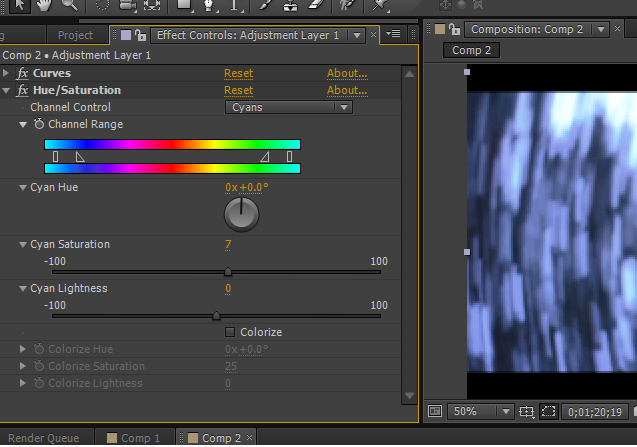
Although not complete, I added a basic color correction to the music video by creating an adjustment layer and adding curves and huw/saturation from the list of options, I made sure that the color green was slightly more noticeable and reduced the amount of blues.
I have rendered together a first draft of the opening 1:40 of my music video, make sure you also watch it in 720p for the best results!
Here are the composition settings I have used for my music video, 1280x720 was the screen size in which I will be using meaning that my final project will be in HD.To get the anamorphic look in my music video, I created a black 'solid' layer, I then used the rectangle tool to create a suitable black rectangle over the video, I then changed the rectangles settings to 'subtract'.
Although not complete, I added a basic color correction to the music video by creating an adjustment layer and adding curves and huw/saturation from the list of options, I made sure that the color green was slightly more noticeable and reduced the amount of blues.
I have rendered together a first draft of the opening 1:40 of my music video, make sure you also watch it in 720p for the best results!
Construction: Day One Of Filming

At 4pm, I was also aware that sunset would be occurring soon which meant that lighting could be affected, this meant I could only film a certain amount of the music video. Thankfully, I knew what I was doing as I had thoroughly prepared the sequence of shooting, this meant that filming time was significantly shortened but I still did not get all the footage I needed.
In order to complete my music video, I will need another day of shooting in similar conditions. I will need to take note of the weather and also the characters costume and appearance so it perfectly blends.
Research: Playing with the Nikon D3200
Today is the first day in which I can spend time taking clips with the camera which I will use for my music video, I felt to get to grips with the camera I should spend some time researching the different aspects of the camera and coming to terms with the software in which I will use to edit and render. Below is a little video I made showing the capabilities of the camera, you may also notice that I have cropped the height of the video to make it look more cinematic and have also used a color correction.
I also wanted to test out one of the movements in which I will use in my music video, the movement is called a 'camera swipe' and makes the camera seem as if it is swiping to another location. Below is my short attempt at the effect.
I also wanted to test out one of the movements in which I will use in my music video, the movement is called a 'camera swipe' and makes the camera seem as if it is swiping to another location. Below is my short attempt at the effect.
Research: In-depth look into the Nikon D3200
In order to capture the best shots for my music video, I will need to get to grips with the camera I will be using for my project, the camera I will be using is the Nikon D3200. I will need to learn the different interesting aspects in which the camera is capable of creating, so I have made this post for revision and also future reference when using the camera.
Changing the aperture:
Changing the aperture will be an important skill in which I would need to learn, this is because it helps create a stronger depth of field for various shots. I have found a video in which shows how to change the aperture on the D3200.
Below is an extract I found from here describing how to control the depth of field usng aperture:
Although a lens can only bring objects at a single distance from the camera into critically sharp focus, other parts of the scene in front of and behind the most sharply focused plane appear acceptably sharp. The area in which everything looks sharp is called depth of field. Objects within the depth of field become less and less sharp the farther they are from the plane of critical focus. As the distance increases, things eventually become so out of focus that they no longer appear sharp at all. The near and far edges of your depth of field are usually not visible as exactly defined boundaries. Instead, sharp areas imperceptibly merge into unsharp ones. At normal shooting distances, about one-third of the depth of field is in front of the plane of critical focus (toward the camera), and two-thirds is behind it (away from the camera). When the camera is focused very close to an object, the depth of field becomes more evenly divided.
To see the depth of field on an SLR-type camera, you press a depth of field preview button that stops down the aperture to the one that will be used to take the photo. On point and shoot digital cameras, the best way to check depth of field is to take a trial picture and then play it back on the monitor where most cameras will let you zoom it and then scroll around it to examine details.
Often it doesn't matter so much exactly what you are focused on. What does matter is whether or not all of the objects you want to be sharp are within the available depth of field so they appear sharp. There are reasons you may want parts sharp or not. You may want only a part of the setup in sharp focus to give it emphasis against a softer foreground or background. On the other hand you may want everything sharp to show details. To control how deep or shallow depth of field is, you have three factors to work with.
How to do it: NOTE; It can't be adjusted in live view mode. To adjust the aperture exit the live view mode on hold down the exposure compensation button, which looks like +/- at the top-right of the camera. Then turn the adjustment wheel situated below.
Movie mode settings:
The movie mode setting gives the user a variety of settings which could help them whilst recording, for example a view which shows you sound levels and where the film will be cropped. More importantly there is an option which gives you a range finder. You can change the movie settings by pressing the 'info' button at the top of the camera.
Changing image quality:
Press the info button to the left of the screen, you can browse through a variety of settings but 'qaulity' is located at the top of the list. In order to gain the best shots you must change the quality settings to 'raw'.
Future referencing
Before I go out and start filming I will make sure I watch the video situated below in order to revise all the different buttons and options the D3200 has to offer:
Changing the aperture:
Changing the aperture will be an important skill in which I would need to learn, this is because it helps create a stronger depth of field for various shots. I have found a video in which shows how to change the aperture on the D3200.
Below is an extract I found from here describing how to control the depth of field usng aperture:
Although a lens can only bring objects at a single distance from the camera into critically sharp focus, other parts of the scene in front of and behind the most sharply focused plane appear acceptably sharp. The area in which everything looks sharp is called depth of field. Objects within the depth of field become less and less sharp the farther they are from the plane of critical focus. As the distance increases, things eventually become so out of focus that they no longer appear sharp at all. The near and far edges of your depth of field are usually not visible as exactly defined boundaries. Instead, sharp areas imperceptibly merge into unsharp ones. At normal shooting distances, about one-third of the depth of field is in front of the plane of critical focus (toward the camera), and two-thirds is behind it (away from the camera). When the camera is focused very close to an object, the depth of field becomes more evenly divided.
To see the depth of field on an SLR-type camera, you press a depth of field preview button that stops down the aperture to the one that will be used to take the photo. On point and shoot digital cameras, the best way to check depth of field is to take a trial picture and then play it back on the monitor where most cameras will let you zoom it and then scroll around it to examine details.
Often it doesn't matter so much exactly what you are focused on. What does matter is whether or not all of the objects you want to be sharp are within the available depth of field so they appear sharp. There are reasons you may want parts sharp or not. You may want only a part of the setup in sharp focus to give it emphasis against a softer foreground or background. On the other hand you may want everything sharp to show details. To control how deep or shallow depth of field is, you have three factors to work with.
- Aperture size. The smaller the size of the lens aperture (the larger the f-number), the greater the depth of field. The larger the aperture, the shallower the depth of field.
- Camera-to-subject distance. As you move father from the subject you are focused on, you increase depth of field. As you move closer, you decrease it.
- Lens focal length. Zooming out to a wider angle of view increases depth of field. Zooming in decreases it.
How to do it: NOTE; It can't be adjusted in live view mode. To adjust the aperture exit the live view mode on hold down the exposure compensation button, which looks like +/- at the top-right of the camera. Then turn the adjustment wheel situated below.
Movie mode settings:
The movie mode setting gives the user a variety of settings which could help them whilst recording, for example a view which shows you sound levels and where the film will be cropped. More importantly there is an option which gives you a range finder. You can change the movie settings by pressing the 'info' button at the top of the camera.
Changing image quality:
Press the info button to the left of the screen, you can browse through a variety of settings but 'qaulity' is located at the top of the list. In order to gain the best shots you must change the quality settings to 'raw'.
Future referencing
Before I go out and start filming I will make sure I watch the video situated below in order to revise all the different buttons and options the D3200 has to offer:
Editing: Changing editing software
Adobe After Effects gives me a series of more options in which i cannot use in Premiere Pro, these options gives me more of a variety when coming to edit. i also know a vast amount regarding the software which will help me to edit and navigate around the software which will hopefully produce a more satisfying editing experience.
Planning: Chosen film date & details
in order to chosen a certain date which will benefit myself and the filming schedule I need to figure out various different events which could hinder or will benefit my schedule, below is a list of what i need to know before I choose a date for filming:

Location
- Whether the cast is eligible to participate on the chosen date.
- The weather on the chosen date
- Location is eligible to use on chosen date.
- Equipment can be rented for chosen date.
I have chosen the date 1st or 2nd February for the proposed date I wish to film, in order to film on this date I must again go through the options I listed above to see if it's possible.
Cast
I have had the confirmation that the cast member which will feature within my music video is able to participate within the filming on the 1st February, this means that I wouldn't need to change the date due to the casting not being able to make it.
Predicted weather
For my music video I need the day to be sunny, if it was cloudy or raining then it would ruin the slight exposure I wish within my shots, below is a predicted weather forecast for the day.
As you can see there is predicted all different types of weather throughout the 1st February, I could take the chance of filming on that day as there is a chance of sunshine however it seems that the 2nd February could be a better day to film.
Location
As I have knew throughout planning my location, i was able to use my locations any time, throughout any day of the week as it's open to the public. This means that the location will not interfere with the date I film.
Equipment
The most important part of the planning process would be whether I am able to book out all of the equipment I need for the filming process.
Target for next week
Below is a list of what I shall have done by next tuesday;
-Change order of posts (casting should be lower down)
-Choose date for start of filming, decide with cast
- Find the date when I can rent out equipment
-Change order of posts (casting should be lower down)
-Choose date for start of filming, decide with cast
- Find the date when I can rent out equipment
Planning: Typography for music video
Today I was practicing the art of typography on Adobe After Affects. I had the idea of adding typography at the beginning of my music video when I was watching other professional music videos. The introduction would usually add the use of typography to introduce the artist or song name, this is what I intend on doing.
Below is the short video I made demonstrating my skills of typography.
Below is the short video I made demonstrating my skills of typography.
Subscribe to:
Posts (Atom)